3.8 Setting up the Identity Agent credential profiles
You must create at least one new credential profile for issuing mobile IDs to mobile devices.
The credential profile contains the certificates that you want to issue to mobile users. You may create as many of these credential profiles as you need.
3.8.1 Creating the Identity Agent credential profile
To create a credential profile for issuing mobile identities:
- From the Configuration category, select Credential profiles.
- Click New.
-
Type a Name for the credential profile.
-
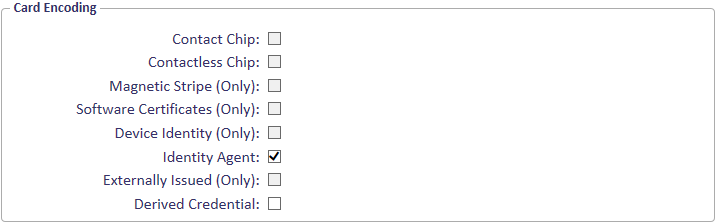
In Card Encoding, select Identity Agent.

-
In Issuance Settings, set the following options:
-
Require Fingerprints at Issuance – set to Never required.
-
Require Facial Biometrics – set to Never required.
-
Notification Scheme – select one of the following:
-
Default – MyID sends the collection URL as an email, the authentication code as a separate email, and the authentication code as an SMS.
-
None – MyID does not send any notifications. You must use the Request Mobile (View Auth Code) option in the MyID Operator Client to display the collection URL and authentication code on screen.
-
Mobile Only – Auth Code Via Email – MyID sends the collection URL as an email, and the authentication code as a separate email.
-
Mobile Only – Auth Code Via SMS – MyID sends the collection URL as an email, and the authentication code as an SMS.
Note: Notification schemes are relevant only for mobile devices requested through the MyID Operator Client or the MyID Core API. They do not affect the notifications sent when you request mobile devices through MyID Desktop or the Credential Web Service API.
See section 3.4.1, Configuring SMS and email notifications for the MyID Operator Client.
The complexity of the authentication codes is determined by the Certificate Recovery Password Complexity configuration option (on the Certificates page of the Operation Settings workflow). See section 3.2.2, Setting the authentication code complexity for details.
-
-
-
In the Mobile Device Restrictions drop-down list, select one of the following:
-
Any – The mobile identity can be loaded onto any mobile.
-
Known Mobiles – The mobile identity can be loaded onto any mobile that has already been registered with MyID. See section 3.6, Registering mobile devices for details.
-
My Mobiles Only – The mobile identity can be loaded only onto mobiles associated with the user's account.
-
-
In Device Profiles, set the following from the Card Format drop-down list:
-
To issue certificates to the iOS or Android System Store, select the generic Mobile card format with the System Store container. MyID will detect the type of mobile device when the mobile identity is issued and issue certificates to the appropriate system store, iOS or Android.
-
For Microsoft Intune and VMware AirWatch enabled mobile devices, make sure that None is selected.
-
For all other mobile devices, make sure that None is selected.
Note: If you attempt to issue a mobile device using a credential profile that includes support for certificates stored in the iOS System Store, but the mobile device does not support these certificate stores, the issuance will succeed; however, any certificates specified by the credential profile to be installed to containers that the mobile device does not support will be ignored.
For example, if your credential profile contains an iOS Signing certificate, an iOS Encryption certificate, and a certificate with no container specified, an iOS-enabled mobile device will receive all three certificates, while a mobile device that is not iOS-enabled will receive only the certificate with no container specified.
-
- Click Next.
-
Select the certificates you want to make available.
-
If you are issuing multiple certificates to the iOS System Store, make sure that all of the certificates have the same expiry date; if the certificates do not have the same expiry date, you will not be able to renew them, as all of the certificates are added to the same iOS security profile in the system keystore.
You can also select the System Store for one or more certificates. See section 3.7, Setting up iOS OTA provisioning for details of provisioning certificates to the iOS System Store.
-
For credential profiles that use the Mobile data model, you can select the System Store for one or more archive certificates.
-
For Microsoft Intune and VMware AirWatch enabled mobile devices, do not select any containers.
-
For all other types of credential profiles, do not select any containers.
All of the certificates you select here will be issued to your mobile device.
You can select the archived and historic certificate options on this screen. See the Selecting certificates section in the Administration Guide for details of the Issue new, Use existing, and Historic Only options.
If you want to distribute certificates that were not issued through MyID, you can import a PFX file then select the Unmanaged certificate option to specify it for distribution to the mobile device. See the Import and distribute certificates to devices section in the Administration Guide for details of setting up your credential profile and using the Upload PFX Certificates workflow.
-
- Click Next and proceed to the Select Roles screen.
-
Select the roles you want to be able to issue and receive this credential profile.
-
The Can Receive option determines which roles can receive credentials issued using this credential profile.
-
The Can Request option determines which roles can request credentials using this credential profile; for example, using Request ID for operator requests or Request My ID for self-service requests.
-
The Can Validate option determines which roles can validate requests for credentials using this credential profile using the Validate Request workflow.
-
The Can Collect option determines which roles can collect credentials using this credential profile; any user who is to receive a mobile identity must have both the Can Receive and the Can Collect options.
-
The Can Unlock option determines which roles can unlock mobile identities using the Unlock Credential workflow.
Note: Not all options may be available, depending on your system configuration. See the Working with credential profiles section in the Administration Guide for details.
Note: Any role you want to receive mobile identities must have the Issue Device option selected in the Cards category within the Edit Roles workflow.
-
- Click Next.
-
Select the card layouts you want to make available to the mobile device.
Badges based on these layouts will be transferred to the mobile device as part of the mobile ID. Note, however, that the reverse sides of the selected layouts (the _back layouts) will not be available on the mobile device.
Note: Card layouts are optional, and will be created only when using the Intercede key store and certificates are selected in the credential profile.
-
Select one of the layouts to be the default layout.
This layout will be displayed by default when using the Identity Agent app, and will be used for phone-to-phone identity verification.
- Click Next.
- Type your Comments and complete the workflow.
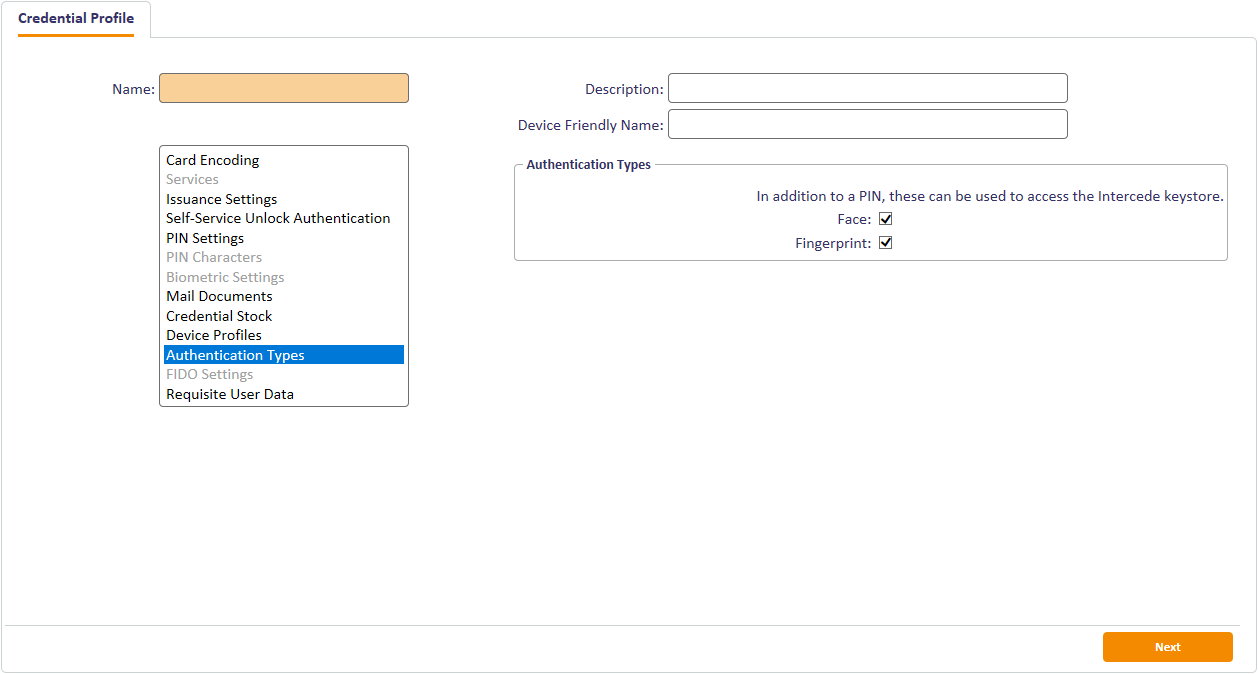
3.8.2 Configuring authentication types for Identity Agent credential profiles
In the Credential Profiles workflow, when you select a Card Encoding type of Identity Agent, the Authentication Types section becomes available; this allows you to specify the additional types of authentication that are available for the end user to use to access the Intercede keystore. If you do not select any additional authentication types, the user will be able access the Intercede keystore only using their PIN.
Note: A PIN is mandatory, as it provides a fallback option to the user in the event that they are unable to provide any of the other authentication types.
To set the authentication types:
- From the Configuration category, select Credential Profiles.
- Click New.
- From the Card Encoding list, select Identity Agent.
-
Click Authentication Types.

-
Select the following:
-
Face – if the mobile device supports it, the user can use facial biometrics to access the Intercede keystore. Available on iOS devices that support facial ID only.
-
Fingerprint – if the mobile device supports it, the user can use fingerprint biometrics to access the Intercede keystore.
-
- Click Next and complete the workflow.